
Greetings Copic readers! In our previous blog, we moved inside our travel journals, where we sketched and outlined two different weekly inserts. Today, we’ll be showing how to create two destination entries for your travel journal, using the city of Venice, Italy as the destination. And with that, let’s pick up our pencils, erasers, Multiliner pens and get started!
![]()


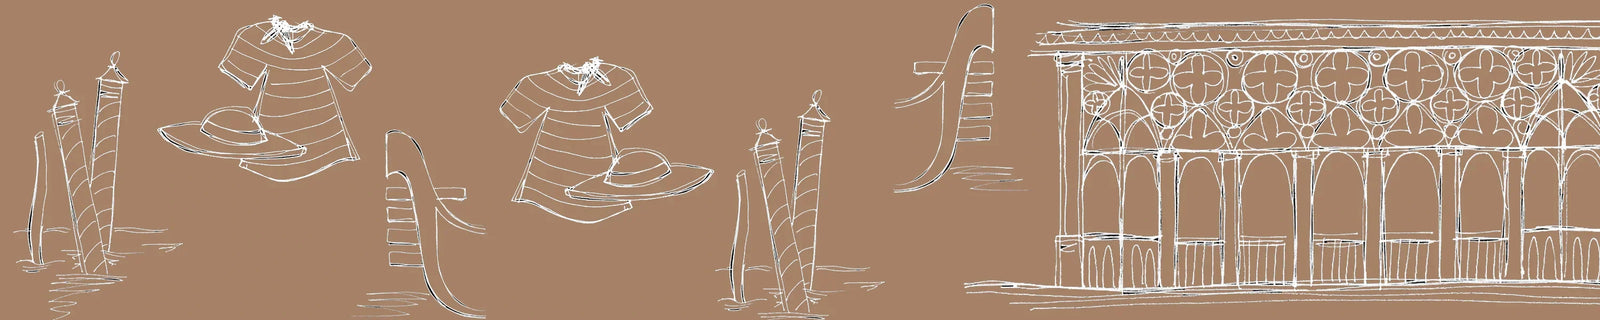
The blank template on the top is a bit intimidating; there’s no information on it, leaving it completely open to what you want to write and sketch. The two templates below it are here to give you an idea on how to set up your blank insert: with your description and writing on the left side and illustration beside it, or your drawing on the left side and the description on the right.
In this blog, we will show both options and let you choose which one you like more for your own journal. If you intend on using multiple entries, perhaps try a mix of both formats!


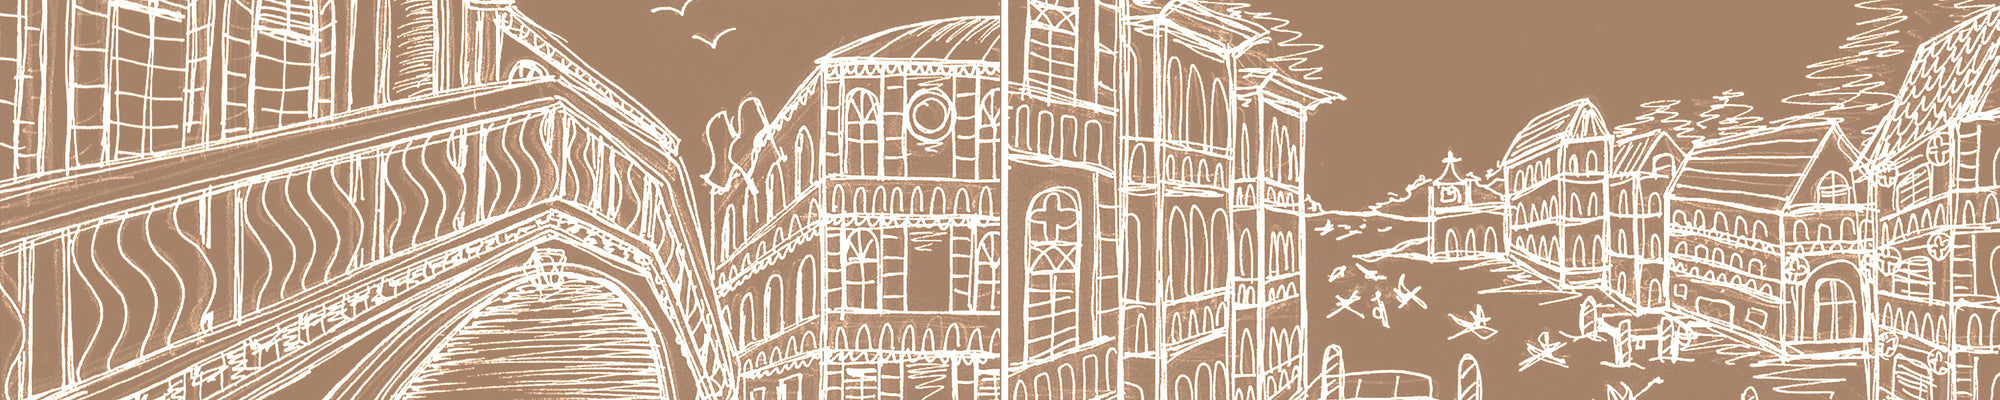
The first step in both of these entries is to sketch the site and record the date. To keep it simple, the artist is using the spine of the journal to divide the sketch from the journal entry. Using an HB pencil and pressing lightly to the page, the artist loosely captures the scene, especially the kayakers in the Grand Canal on the top/first example. There’s a lot going on in this scene with many people moving around quickly. Sketching without worrying about exact precision helps to create a gestural look, like the scene on the page is moving too!


The next step follows a predictable pattern; outlining the pencil sketch with a Multiliner pen(s). To keep with the sketchy, gestural look, the artist chose to only use one nib width, 0.3 mm, and “speed-sketched” each scene. Not all lines meet up perfectly and the perspective isn’t 100% accurate, but the scene looks captured in-motion and tells a story. This plein-air approach to drawing helps train artists to rely on their first instinct; there’s no “delete” button when sketching with a pen!
At this point in the outlining process, you can also begin to write any notes or memories from the trip while at this particular landmark. In the Ponte di Rialto sketch (bridge/bottom example), the artist begins to write their thoughts from that location. Formal sentences and proper punctuation aren’t necessary; your travel journal can be bullet notes or short phrases from the day - whatever helps you to remember the fun you had on your trip!


The final step is to finish adding your thoughts to your sketched entry and to erase your pencil marks. Any memorable people, food, smells, sights, etc. can be jotted down on the opposite side of your drawing. Perhaps, too, while you’re creating your drawing, you want to come back and revisit what you want to write about later. Or, vice versa; you have a lot to write about but don’t know quite yet how you want to capture it in a drawing. Maybe you want to draw something from a photo you took. Maybe you don’t want to draw a scene from the actual trip, but a favorite memento or object, like a postcard, magnet, or other souvenir. Whatever the case may be, this is a great time to clean up your visual and written notes and preserve this memory from your trip.
![]()
And with that, we wrap up today’s blog! To give this lesson a try yourself, download the above blank template here from our line art gallery and print it on a sheet(s) of smooth cardstock suitable for pencils and Multiliner pens. We recommend Neenah Bright White Premium Cardstock 65 lb. paper, which was used in this blog. Then, using your pencils and pens, sketch and outline your own featured entry inserts using the examples from this blog as a guide.


If, however, you want to flex your writing muscles using either the Multiliner pens or Acrea markers, print the above line art examples from today’s blog here. This is also a great way to get ahead and practice any color schemes you’re interested in, since coloring our travel journals is only a natural next step!
In our next blog, we’ll be showing one more illustrated feature to conclude the sketching and outlining portion of creating our travel journals. Until then, don’t forget to follow us across our social media channels @copic_official_us, and sign up for exclusive discounts and prizes by joining the Copic Club! One last thing - use #copicwithus or tag us @copic_official_us for a chance to have your drawings or workspace featured on our Copic US social media channels.


Thank you so much for reading and enjoying Copic markers as much as we do! 😀